Introduction
This week we used a completely different image gathering technique. All the other image collecting mission have been flown at 90 degrees or in a Nadir format (Figure 1). Nadir imagery is great for looking at spatial relationships between objects on the ground but it does not pick up on 3D objects very well. You only get the rood roof of the structure. This week we collected the images at a 45 degree angle or in an oblique format (Figure 2). Collecting oblique images allows for the construction of 3D images, which is a big up and coming area of study in the UAV industry. By taking the photos at a 45 degree angle you can get the side of the buildings from all angles and also fly the roof structure giving you a near perfect 3D representation of the structure you are imaging.
 |
| Figure 1 This is a Nadir image collected a few weeks ago of the pavilion from about 60m up. The camera is facing 90 degrees to the Earth's surface and does not pick up on 3D objects very well. In a 3D rendering of this image the roof of the pavilion would be higher than the area around it but the sides of the building would not be modeled they would just be black spaces or nothing. |
 |
| Figure 2 This is an oblique image collected at 45 degrees. Multiple pictures taken from this angle allow for the construction of 3D models. |
Study Area
The study area for our 5th activity and final activity in the field for the semester was again the Eau Claire Sports Center soccer complex (Figure 3). It was a beautiful day, couldn't ask for better weather in the middle of October. It was around 65 degrees, slight winds with light wispy clouds and a lot of sun. We flew the image collection mission right away to assure we had proper lighting on the structure because the sun goes down pretty early this time of year. For the oblique imaging we chose the pavilion in the middle of the fields. It is a + shaped building approximately 5m high to the roof peaks. It is in a good location to fly because there are no tress or flag poles near by to interfere with the image gathering.
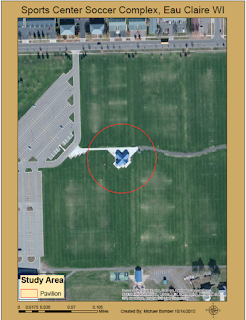 |
| Figure 3 This the soccer complex where we conducted this weeks flights. The red circle is around the pavilion we flew to create a 3D model of in the next few weeks. |
Methods
We used two different platforms this week to gather imagery as well as two different cameras. The first mission was flown with the Iris (Figure 4) platform made by 3D Roboics. Attached to the platform was a GoPro HERO3. The GoPro isn't the most ideal sensor for this application because it does not have an internal GPS. In order to make a 3D model with the GoPro GPS locations form the flight log are joined to the JPG files to create the model. The Mission Planner app also made by 3DR has a function called structure scan. In this function you find the structure you want to fly on the base map of the app. Then you click a center point directly over the center of the structure. You then set the radius of the circle, how high the platform should fly and how many times it should change altitudes during the flight. For the Iris flight Dr. Hupy set it to start at 5m altitude and take a picture every 2 seconds as it flew in a circle around the pavilion. The Iris then would increase altitude by 4 meters each time it went around the structure all the way up to 26m. It is easy to visualize if you think of the drone flying a corkscrew pattern around the building. Once it reached 26m Dr. Hupy set a cross pattern across the top of the roof to ensure that the roof structure was adequately imaged.After the Iris completed its auto mission I flew it manually around the building at approximately 2m to get the lowest part of the pavilion as well as under the over hangs so that when we create the model even the areas under the roof canopy will be imaged and not just come up as black space. The auto pilot app for gathering oblique imagery was really cool to see work as this was the first time any of us had ever used it. As always I was at the controls ready to take over if the Iris got too close to the building.The flight was only about 5 minutes of auto pilot and it collected about 150 images so doing a structure model like this doesn't take a platform with long battery life. That is why the Iris is good platform to use for this kind of data collection. Its compact size is also ideal.
 |
| Figure 4 This is the Iris with e GoPro mounted on a gimbal. The gimbal allows the user to rotate the camera up and down, left and right to get the desired angle for imagery collection. |
The other platform we used to fly the pavilion was the DJI Phantom (Figure 5). The Phantom is another very compact platform with a short battery life ideal for this application. It is also equipped with a very high resolution camera that comes as part of the platform. The Phantom geotags all the images it takes or in other words assigns a lat/long position to each image which makes 3D model creation much easier because the image processing software looks at those geotags and arranges the images according to them. There is no need to use the log file GPS points like when you use the GoPro. The Phantom mission was flown completely in manual. There is an auto pilot app for the Phantom but Dr. Hupy has been having trouble with the app crashing mid-flight which is a safety hazard and does us no good if we can't image the whole structure. Everyone in the class got a chance to fly the Phantom and collect images. The same corkscrew pattern was flown, as best as could be done, and the cross-hatch over the roof was also done just like in the first mission. The camera was kept at approximately 45 degrees during the flight to ensure we were collecting oblique imagery and not Nadir. The Phantom flight took about 15 minutes and just under 200 images were collected.
 |
| Figure 5 This is the DJI Phantom. The camera is also on a gimbal but this camera is part of the drone unlike the GoPro. The geotage feature of this platform makes it ideal for image collection and the very compact size makes it perfect for structure modeling, because the user can get into small areas. |
Discussion
Oblique imagery collection is a totally different method than Nadir image collection and you have to have a different mind set when flying this type of mission. There is more attention to detail because you have to make sure every inch of the structure is imaged. One image for each surface will work but multiple overlapping images on each surface will give you better 3D model and greater detail. Both of our flights probably had way more images than are necessary. The Iris auto pilot flight collected around 150 images and you could probably create a 3D model from 50 or so images but our model will be better. Image overlap is important in oblique imaging just like when collecting Nadir images. It would've been interesting to see the Phantom fly an auto pilot mission to see how it flies compared to the Iris. The Phantom has a tendency to fly smoother than the Iris, this is especially true when I have flown it in manual. I am excited to see the 3D model in a couple of weeks when we run this data. This summer Dr.Hupy imaged a shed at South Middle School garden and it turned out really well so it will be interesting to see how this one turns out and compare the two.
Conclusion
Oblique imagery is a great way to create 3D models. There are many applications for this type of imagery collection. Bridge inspections, roof inspections, and insurance damage claims are a few areas where I see this technique being very useful. You can create 3D models and with the high picture resolution and insane detail capabilities with some of the platforms available you could easily find cracks, dents or whatever you are looking for in the inspection and not only be able to look at it live but also have a 3D model that you can look back on later. The reality business could easily use this for creating virtual tours of properties or at least being able to click and drag a 3D model of the house on their website. This would make it more interactive for the home buyer and not only be able to look at a bunch of JPGs but pan and zoom on the whole structure again with crazy detail. As the UAS field continues to grow and rapidly expand it will be interesting to see what other applications this can be applied to.


It is really a great post!
ReplyDelete3D modeling
I have gone through the site and read all blogs and this is a nice one:
ReplyDeleteaerial drone gamma surveys